Thursday, September 30, 2010

Oh what a wonderful day

Congratulations, little Liz. We all love you and are so happy for you. Thanks for sharing your day.


It's almost October!

You know what that means, right?

As of tomorrow, I get to put up Halloween decorations! Which means I'm doing some shopping tonight :D

But aside from buying decorations, I wanted to try and make a few things, too. What can I say, I'm feeling crafty these days. I just don't know what to make! Here's a few I've run across, but I'm curious if any of you have any fun halloween crafts you'd like to share.


Wednesday, September 29, 2010

Try this: Chicken Enchiladas

I didn't take a photo of this one. We scarfed it too fast. But it was so delicious, and we will definitely be making it again. So if you're looking for a good chicken enchiladas recipe, try this one out.

We couldn't find Anaheim peppers, so we used poblano. They worked fine, but I would have liked something a little spicier. Maybe try adding in some green chiles or something.


Recipe from TheKitchn.

Enchiladas Verdes
4 to 6 servings
1 pound skinless, boneless chicken breasts
12 Anaheim green chili peppers
1/2 cup canola oil for frying
1 quart Suero de Sal (whey) OR buttermilk can be used as a substitute
2 tablespoons flour
1 medium white onion, diced
12 to 18 corn tortillas, preferably white corn
1 1/2 cups white shredded cheese (Monterey Jack, Azadero or Muenster)
1/4 queso fresco, crumbled
1/2 cup crema or sour cream (for sauce and topping)
Salt (to taste)
Water (if needed)
Directions
Roast Chili Peppers
Preheat broiler. Select firm, meaty peppers without wrinkles for roasting. Wash thoroughly. Place peppers evenly in a single layer on a foil-lined cookie sheet. Place under broiler. Watch them closely as the skin will blister and turn black within minutes. Turn the peppers after 5 minutes to blister all sides evenly. When done, the pepper skins should be evenly blistered and mostly black. Place roasted peppers in a plastic bag, cover with a kitchen towel and when cool, rub off blackened skin. Tear open and pull out the seed pod and stem.
Sauce
In a blender combine the peppers, flour, and half of the suero or buttermilk and blend until creamy. Pour mixture into medium skillet and set over medium-low heat to warm. Add additional suero or buttermilk and stir. Taste and season with salt, usually about 2 teaspoons. If the sauce is too spicy, add 1/4 cup of crema or sour cream and stir. If the sauce is too thick, add water until desired consistency is reached.
Chicken (Optional)
In a pot with enough water to cover, boil chicken breasts 25 minutes or until juices run clear. Drain, cool, and shred. Optional time-saver: shred a store bought rotisserie chicken.
Oven Style
Preheat oven to 350 degrees. Spread 1 cup of the sauce in an ungreased 9-by-13-inch baking dish. Fry tortillas in hot oil just until softened. Drain on paper towels. Fill with cooked chicken, cheese, and onion. Roll, placing seam side down.
Pour 2 cups of the sauce over enchiladas. Sprinkle with crumbled queso fresco and bake until warm, about 15 minutes. Serve with a dollop of crema or sour cream and your favorite side dish.

Tuesday, September 28, 2010

Love it.

When I woke up this morning, it was 51 degrees. 

It feels wonderful.

Monday, September 27, 2010

Yellow in the kitchen

I started this project well over a month ago. I just now got around to finish it. Hans has been giving me grief to no end.

While it looks like a Roman shade, it actually isn't. It can't go up and down - it's just there to look pretty and add some color.


The fabric came from Ikea, of all places, after I searched high and low in Austin and couldn't find what I wanted. I sewed it together with a piece of plain white muslin for a backing. After that, I folded and pinned the fabric where I wanted the layers to be. Using a needle and thread, I sewed little knots in several places to hold the folds in place without being too conspicuous. Each fold is anchored by a wooden dowel, to help keep the crease neat and to weigh it down a bit. Next, I attached the top of the shade to a thin strip of wood using a staple gun. Hans then hammered the wood anchor straight into the wall and voila! We have a shade.

Detailed instructions found at CentsationGirl.

Why we sit in the front

Yesterday during church I was reminded of an incident that happened during sacrament while I was growing up.

My mom has always insisted that we sit in the first or second row. The rest of us hated this because we were usually late and it felt like the walk of shame up to the front to sit in our front-row spot. But it was a hygienic thing. Mom didn't want to take the sacrament after it'd passed by everyone else and been touched, breathed on, coughed on, what have you.

One Sunday, we finally convinced her to give sitting farther back a try. We sat about half way in the middle section. When the water tray came, there were five cups left. One of them had a cheerio floating it. We all quickly calculated who the fifth person was - Josh - and tried not to laugh when the tray got to him and he realized he was stuck and hurriedly gulped it down.

Needless to say, mom won that argument and we've been in the front ever since.

Sunday, September 26, 2010

Bathroom reveal

We're finally done! What do you think??

Before:


After:


Special thanks to Oma, whose house warming gift sponsored this paint! Thanks, Oma!

Up next:
- framing the mirror
- swapping out the lighting fixture
- painting all the trim
- some sort of covering for the window

Monday, September 20, 2010

Tastes like fall

I love fall. It's my favorite time of year. I love the weather. And holiday decorations. And pulling out cardigans. And the return of my favorite pumpkin flavored menu items.

I'm so eager for fall that I decided to break out some fall recipes early. This Zucchini Cake is more like zucchini bread, but the chocolate cream cheese frosting qualifies this as a yummy dessert. It may not look pretty, but tastes divine.


Get the original recipe from Cakespy (via Serious Eats).

Ingredients


3 cups flour
2 cups sugar
1 teaspoon salt
1 teaspoon baking soda
1/4 teaspoon baking powder
3 eggs
1 cup vegetable oil
2 teaspoons vanilla
1 teaspoon ground cinnamon
1 teaspoon grated lemon peel
2 cups (about 2 medium-large) shredded zucchini, skin on
1/2 cup chopped walnuts (optional)
1 package (8 ounces) cream cheese, room temperature (for frosting)
2 tablespoons milk or cream (for frosting)
2 to 3 cups confectioners' sugar, sifted (for frosting)
2 squares unsweetened Baker's chocolate (1 ounce each), melted (for frosting)


Directions

Preheat your oven to 350°F. Grease either two 9-inch cake pans, or line two muffin tins with cupcake cups.

In a large bowl, combine the flour, sugar, salt, baking soda and baking powder.

Stir the wet mixture into the dry ingredients, just until moistened. Gently stir in the nuts, if you've chosen to add them, at this point.

Transfer your batter to your prepared pans or cupcake liners. Bake for 45 to 60 minutes for cakes, 30 to 45 minutes for cupcakes (until a toothpick or cake tester inserted in the center comes out mostly clean).

Once you've removed from the oven, let the cakes cool in the pans for about 10 minutes before transferring to a wire rack to cool completely.

While the cakes cool, make the frosting. In a stand mixer, whip the cream cheese until it is soft and fluffy; add the milk or cream, and then the confectioners' sugar, bit by bit, until it has reached your desired consistency. Add in the melted chocolate last, and mix until it is fully incorporated.

Frost cakes, either using the two 9-inch cakes to make a layer cake, or top each cupcake with a healthy dollop. The frosting yield is fairly generous, so don't be afraid to heap it high.

Sunday, September 19, 2010

Paint update

I'm not so good at the blogging lately.

Mostly because I've been battling a particularly nasty head cold for the past week. When will this thing ever go away? Two bottles of Nyquil, three boxes of tissues, and more sleep than I've had in years and it still won't leave me be. The fever and sore throat are gone, but the congestion and cough just won't quit. I'm over it.

But I digress. Another reason for my lack of blog posts is that we have projects in progress, but moving slowly. The master bath that I mentioned in my last post is *almost* finished and coming along amazingly. Though, it's been a total pain in the butt.

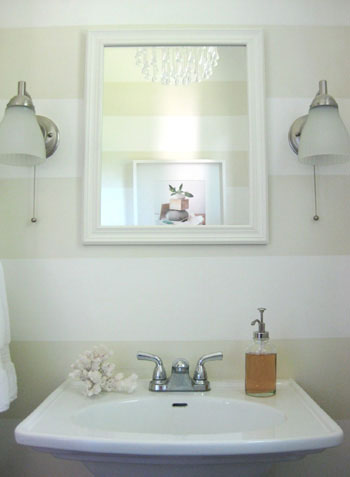
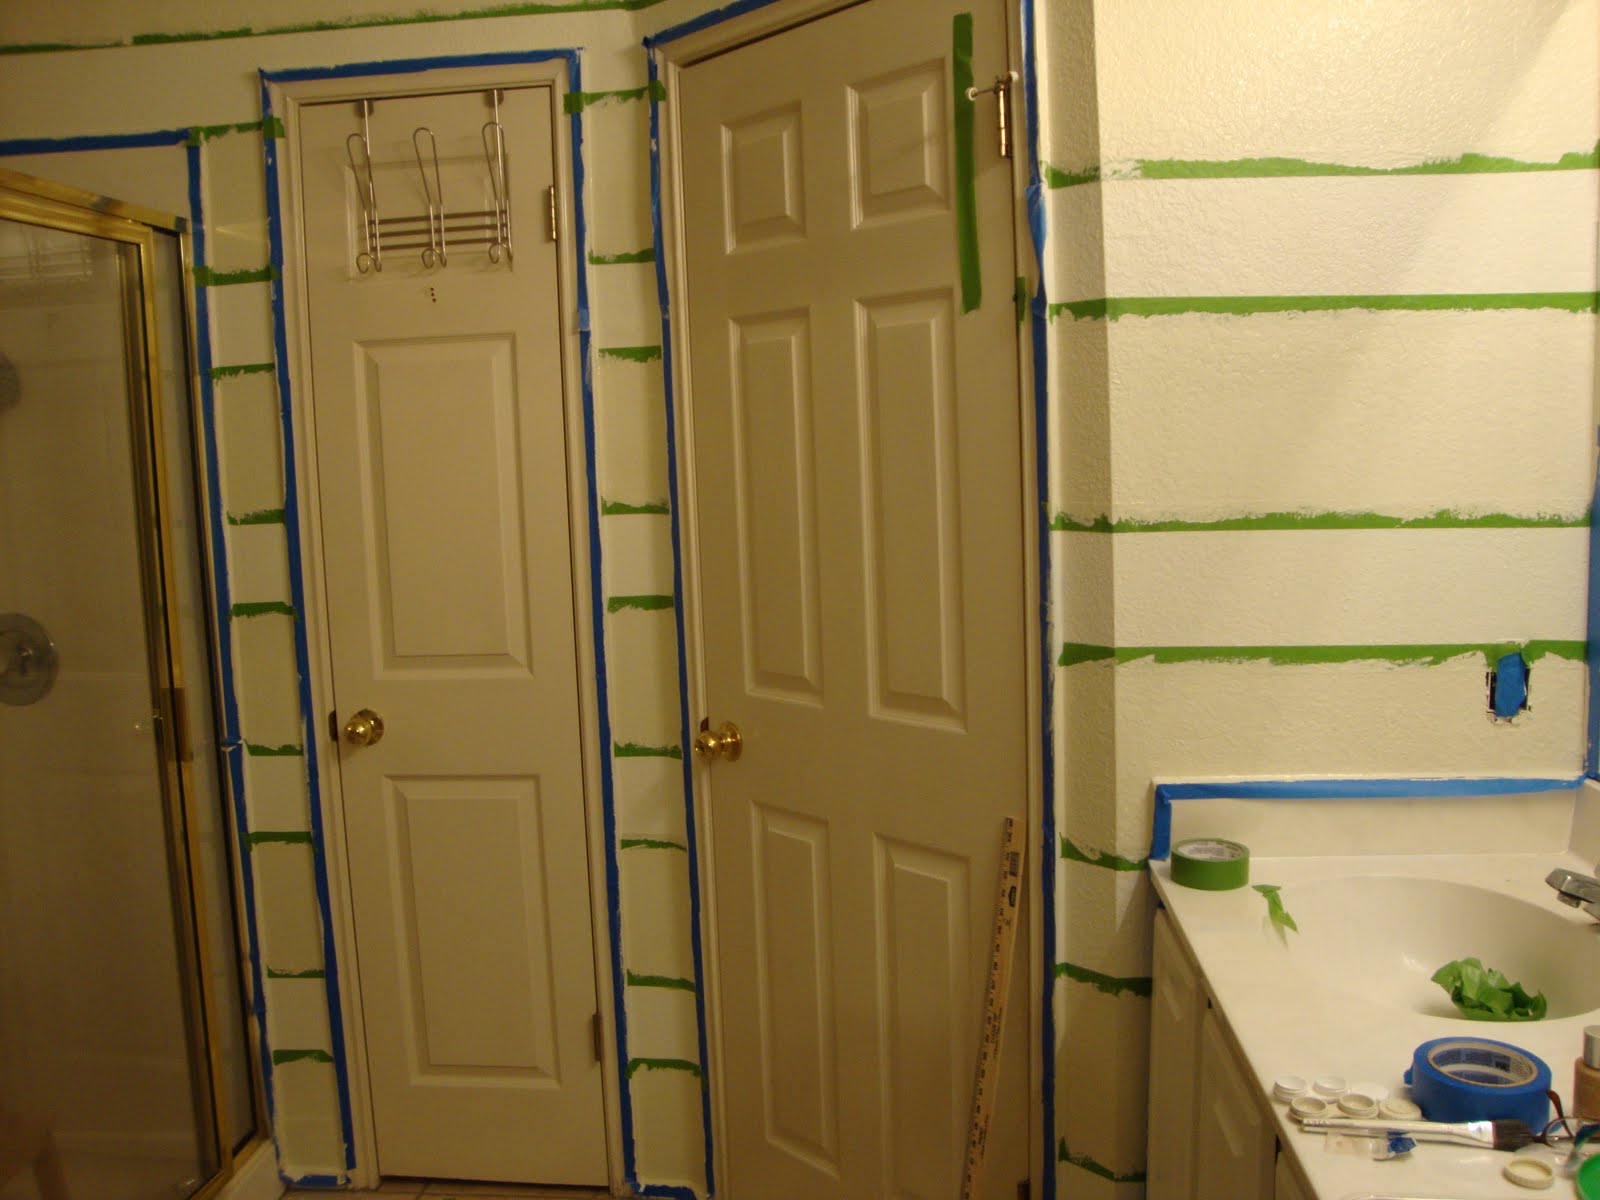
We started with the small little room the toilet is in. Four straight walls, no interruptions. Easy peasy and looks fantastic. We followed the Young House Love instructions and, starting at the baseboards, measured up 8.5 inches and marked off the space. We used a blue chalk line to help keep the lines straight as we taped. And we used Frog Tape. Oh my gosh, Frog Tape. I love you. You are so much better than that blue crap. I don't know how, but Frog Tape makes sure that your paint line is clean. It doesn't bleed the way the blue tape can. It's perfect. I love it and it was our life saver for this project.

After we conquered that little room, we headed out into the main bath. And realized we're idiots. Don't worry, when we called Mandy for help on it she told us just how stupid we are. There was no good way to mark off our lines. The ceiling height varies throughout the room, higher toward the middle and lower toward the outside. So we couldn't measure from the ceiling down. We couldn't measure from the floor up because of the counters, tub, and shower. And we had to find ways to make sure the lines were even across three different doorways. Stupid, I tell you.


It took us about three days, a yard stick, a measuring tape, plenty of chalk tape and a laser level, but we finally got the whole thing marked off. Painting only took about an hour - it was super easy. We pulled the tape off last night and love how it looks. But haha, you don't get to see it yet. I need to go back and do some touch ups - crazy lady who owned the house before us didn't use tape when she painted the room that awful brown color, so you can see remnants of the brown (and actually the orange before her brown) on all the trim. Lovely. I promise I'll post pics as soon I'm done.

Here's a preview of what it looks like in progress... that's a lot of measuring and taping. Stupid.

Oh, and paint. Again, we followed the YHL directions exactly. It's like baking a cake. I don't know what works, it's best to just follow instructions. It worked for them, it'll work for us. So for the darker stripe, we went with Glidden's Eloquent Ivory in an Eggshell finish. It was infinitely cheaper than our beloved Benjamin Moore and infinitely easier to apply than the dreaded Valspar. The coverage seems pretty fair and it went on smoothly for the most part. It was definitely the thinnest of the three paint brands that we have tried thus far. My only complaint was that at some points I thought it seemed a little too thin, and therefore drippy. But if you're careful, it's fine. I'd be willing to use this paint again, especially for the price. To recap:
Benjamin Moore - Best consistency, easiest to apply, best coverage, most expensive
Glidden - Good consistency, though slightly thin; easy to apply; good coverage; cheapest
Valspar - Super thick, tacky feeling, hard to apply, uneven coverage, mid-cost 

Stay tuned for before and after pics!

Saturday, September 18, 2010

Famous last words

We are between health insurance right now. I finished up at the Statesman and didn't want to go on Cobra while I waited for L3's to kick in. That starts Oct. 1.

"It's just six weeks," we thought. "We don't really use it that much."

We also made the rounds (doctors, eye doctors, dentists, etc) before I left the Statesman, just to tide us over.

Then I got sick. And I can't kick it. I've had it for almost 11 days now.
Hans caught it. He's on day three.
And today, Hudson bit Hans' hand. It's deep enough that it could need stitches. Mandy came over and cleaned it out pretty thoroughly and wrapped it, so we're hoping that works for now.

It goes to show you... if you have insurance, you won't ever need to use it. The second you don't have it, all heck breaks lose.

Coooommmeeee on, October 1st!

Wednesday, September 8, 2010

Paint in Progress

Isn't that pretty?

No, it's not my bathroom. It belongs to Sherry and John, from Young House Love. But it's the inspiration for what we're doing in our master bath. In fact, we decided to test out the white they used for the lighter stripes.

Now, you saw me mention a few posts back that I'm in love with Benjamin Moore. Since then I've heard several people extol the virtues of other brands. Hey, I figured, I can keep an open mind. I'll try it.

And so it was off to Lowes to pick up a gallon of Valspar's hi-def paint in Honeymilk.Was it cheaper than BM? Yes, but not drastically. Would I use it again? I can already say.... no.

After two days of painting, we're still not finished. And we've gone through an entire gallon. Let me point out that both our quite large master bedroom and our cavernous living room took less than two gallons of BM paint. I full expected that our small master bath would take maybe half a gallon. But seriously! Already used a gallon and have to go get more. The paint feels very thick and goopy, not smooth at all. Cutting in is difficult and frustrating. And the coverage is uneven, at best.

Hopefully we can finish up with another quart and then the stripes well help cover up the imperfections. No more Valspar paint for me, thanks.

Sunday, September 5, 2010

I want, I want

A new closet.

Or something to make mine bearable.

Right now, ours is not usable. It's very long and narrow, so narrow that if you want clothes on both sides there's not enough room to walk down the middle. We are using the office as a walk-in closet until we figure out what to do.


These would really help.